
How To : Sew Zip Up Pouch
- Sophie
- Jul 18, 2025
- 7 min read
Good morning. Good afternoon. Good evening and good night.
Whichever applies to you - welcome!
Sophie here - let's get this sewed up!

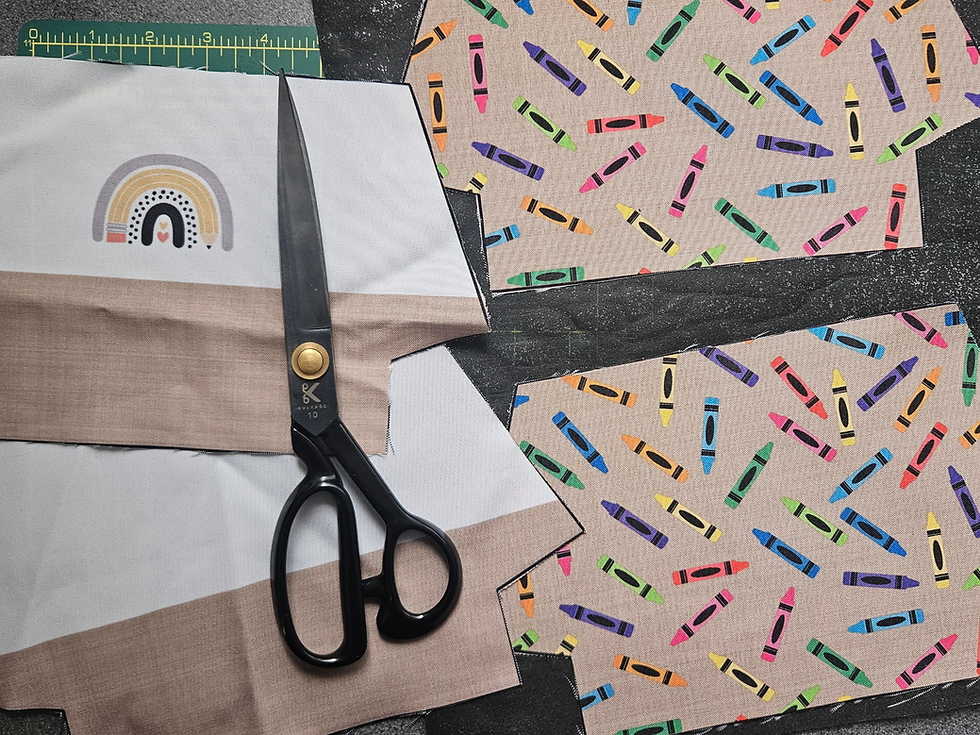
Fortunately, the hard work of measuring and marking this pouch sewing pattern is done for you, and ready to cut out with this fabric panel from us here at Knighton Fabrics! Enthusiastic beginners may be able to complete this project, just make sure to be slow and steady. There are other fabric panels available, but the panel used in this specific set of instructions is here:
The fabric panels do have written instructions on them, but sometimes something more visual is helpful - which is why this blog has been made! Let's start with a "You will need" part of the instructions. - Both "main" zip up pouch pieces from the panel - Both "lining" zip up pouch pieces from the panel - 1 x 12 inch zip ( I tend to use a zip longer than needed to give myself a little extra to hold/work with whilst I sew as I find it less fiddly, you may want to use smaller. ) Thinner zips with plastic teeth are easier to use and less bulky in my experience. - Fusible interfacing (you may want to use fusible fleece or foam for additional structure, too, but this isn't essential.)
For the visuals in this instruction blog, I have used black fusible interfacing on both main pieces and both lining pieces (the wrong sides of the fabric).
As previously mentioned, you may also want to use either fusible foam or fleece to add structure. Simply use the main pieces as a template to cut 2 pieces. But this is not essential to complete the pouch!
If you chose not to add any fusible interfacing, fusible fleece or fusible foam, you will just have these:

1 - Take a "main", a "lining" and the zipper and sandwich the fabrics so that your "main" is the right side up, your zip is the right side down, and your "lining" is the right side down. Pin/clip together along the top edge. If you use a zipper foot, attach it now.

This photo is simply a visual to show the layer order of the sandwiching of the fabrics and the zipper. This includes the fabric side up and the zipper side up. I tend to use a longer zip so that it hangs over the edge and stays out of my way when sewing. This is not pinned or clipped into place in this exact image, only to show layer order.

Your fabric sandwiched layers will look like when clipped (or pinned if you'd rather) into place along the top edge of the main and lining fabric pieces.
You may have another layer if you've added fleece or foam interfacing.
2 - Straight stitch your layers together, making sure to backstitch at the beginning and end of the seam. I don't use a zipper foot attachment, so I sew slowly feeling for the edge of the zipper teeth under the fabric as I go to keep everything lined up.

You can see the end of the zip hanging just off the edge of the fabric and I'm feeling my way for the zipper teeth under the fabric. If you don't have a zipper foot and your machine is capable, you can adjust your needle placement to sew closer to the zipper teeth.

3 - Repeat steps labelled 1 & 2 for the other edge of the zip. This can be more fiddly as the zip is now already attached to the other fabric pieces.

INCORRECT WAY: Make sure you attach the top edge of the fabrics to the remaining zip edge, it's easy to sew the bottom to the zipper edge by mistake. DO NOT ALIGN THE BOTTOM WITH THE ZIPPER EDGE LIKE THE PHOTO TO THE LEFT. I made that mistake for you in advance. You're welcome!
___

CORRECT WAY:
Sandwiching the remaining fabric pieces with the zip will look like this when correctly done for this side!
You can just see the lining fabric on the right side of the zip. The other remaining lining fabric goes right side down on top of the zip, that is facing down. The remaining main fabric is right side up on the bottom of the sandwich.
4 - Open out and heat press the folds down - be careful you don't melt the zip! Then topstitch each side. This stops the fabric from being bunched up in the zip when in use.

Stitch Length:
Increase your stitch length to 3-4mm for a bolder, more pronounced topstitch. Tension: Test your tension on a scrap of fabric to ensure it's balanced and doesn't pull the bobbin thread to the right side or vice versa.
Once topstitched, your project will look something like this:

5 - Pin/clip the bottom edges of the "main" fabrics right sides together. At the other end of the project, pin the bottom edges of the "lining" fabrics right sides together. Using a 1/4" seam allowance, sew across those bottom edges. IMPORTANT - On the "lining" fabrics end, make sure you leave a gap of four to five inches wide for turning your project right sides out later on.

The edges all align perfectly and you can see the zipper ends that extend longer then the project fabric in the centre.
Make sure you mark with either tailors chalk, pen or specific coloured clips that gap you will not be sewing at the lining fabric side.

Making the four to five inch gap in the "lining" fabric end of your project is easier if you leave it in the centre, for turning the project right side out later. If you don't leave a big enough gap, it makes for a more difficult step to turn the project right sides out.

Heat press the seams and keep the zip open (half way is usually enough), but that your zip pull isn't hanging outside of the pouch edges.
6 - Pin the side edges (not the cut corners, just the sides). Sew from one end to the other with a 1/4 inch seam allowance, back stitching at the beginning and end.

TIPS: When you get to the zipper, ensure that the teeth are facing the pouch "lining" fabric. I also find going over the zipper a few times helps to secure it in place.

If you lay your project out as shown right you should now have: - top, bottom, left and right sewn. Seam where the zip is in the centre.
However there should be a gap in the bottom of the section where the pouch "lining" is. The cut-out corners should also be unsewn at this point.

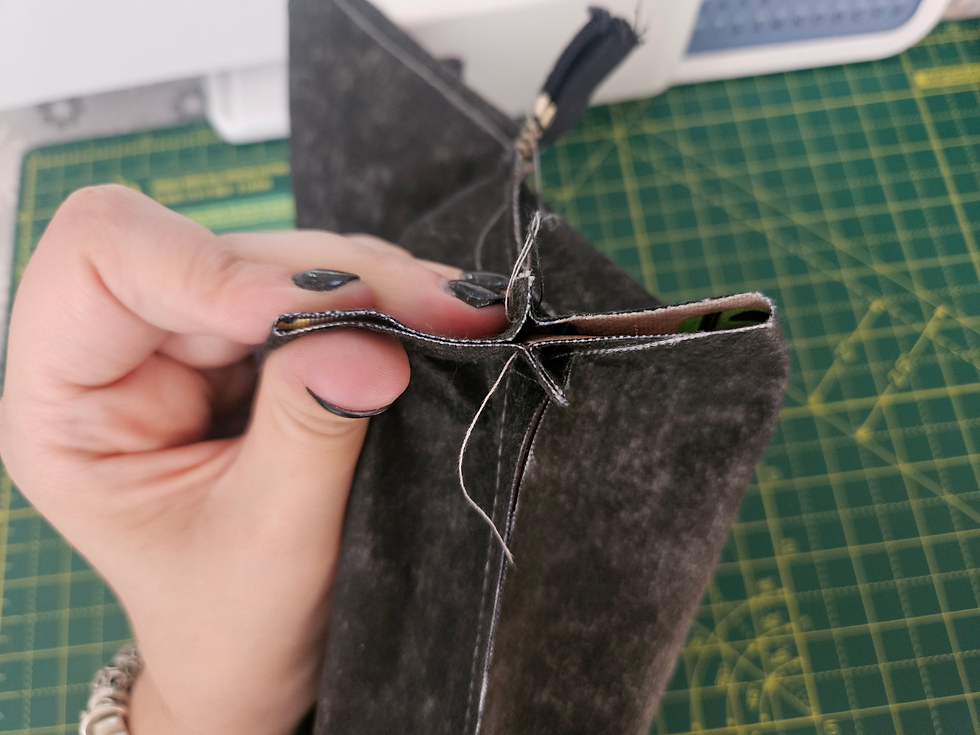
7 - Match up the bottom seam with the side seam, right sides together, in any of the corners.
Line them up and pin/clip them so that they don't move out of place. Notice the side seam and the bottom seam placement in the image to the left.

Stitch across with 1/4 inch seam allowance, and backstitch. Do this for the other three corners, too.
You can if you want to, go over these stitches to secure them a little. They will after all bare the weight of whatever goes inside the pouch!
When the corners are sewn, your project will look something like this (note that the zip still overhangs the project and the zip is half way open inside the project).

8 - Using the gap we left at the bottom of the "lining" fabric, put your hand inside the gap and pull everything right side out through the gap. You may find once your hand is inside that unzipping the bag further helps you to turn right sides out more easily. You can leave the gap to turn right side out on the "main" fabric instead of the "lining" if you want to, the handsewn closing gap may just be more visible as it will be on the outside of the pouch.

This is why it's important to get a big enough gap left so that there is enough room to pull through the fabric from inside to turn your pouch the right side out.
Once right side out you can put your hand inside to sharpen the corners with your fingers.
9 - Tuck the raw edges of the gap in the lining (or main depending where you left your gap), pin or clip into place then hand sew the gap shut using a ladder stitch/invisible stitch.

CONGRATULATIONS!
You're all done. You made it! You made that wonderful, fully lined zip up pouch right in front of you! I hope you're proud of yourself - you deserve it!
We'd love to see your makes over at the Knighton Fabrics Community group on Facebook! Have the most wonderful day!
Sophie
Team Knighton Fabrics


Comments