
How To : Sew-A-Bear
- Sophie
- Aug 29, 2025
- 9 min read
Updated: Aug 30, 2025
Good morning. Good afternoon. Good evening and good night.
Whichever applies to you - welcome!
Sophie here, again - let's get this sewed up!

Fortunately, you can cut out the pieces of this fabric panel from us here at Knighton Fabrics! Enthusiastic beginners may be able to complete this project. Just make sure to be slow and steady.
Fabric Panel Information
There are four colourways of these fabric panels available. All of them can be found here:
The fabric panels come with enough fabric pieces to create four bears! The panel itself doesn't have instructions printed on it, so that we maximized the space available for four instead of three bears. This blog comes as the instructions, instead. Sometimes something more visual is helpful so the photos included in this blog should also be more resourceful - especially to beginners. These gorgeous bears are traditional and/or antique in appearance, with their longer snout, longer arms and (if you make it this way) slouched with a squishy pop belly!
What You Will Need
Let's start with a "You will need" part of the instructions.
2 x side of head pieces from the panel (mirrored set)
1 x head gusset piece from the panel
4 x ear pieces from the panel (2 mirrored sets)
2 x side body pieces from the panel (mirrored set)
4 x leg pieces from the panel (2 mirrored sets)
2 x foot sole pieces from the panel
2 x outer arm pieces from the panel (mirrored set)
2 x inner arm pieces from the panel (mirrored set)
2 x paw pieces from the panel (mirrored set)
Either 2 safety eyes or 2 buttons for the eyes
Either a safety nose or a button for the nose
Soft Toy Stuffing
Dressmaking/Fabric Scissors
Hand Sewing Needle
You may want to use standard needle size 80/12 on your sewing machine.
Sewing Machine (Not overlocker for this project!)
You will likely need between 150g to 200g of stuffing but the exact amount varies based on the stuffing's density and your desired firmness. Begin with small amounts, gradually adding stuffing to shape the bear, aiming for a firm yet cuddly feel, and stop before the fabric becomes stretched or the stitches show.

For the visuals in this instruction blog, I have used multiple of the colourways, but the construction just follows as instructed. The completed bear will be sewn and not jointed/moveable limbs.
As I always say, this set of instructions is just one way of constructing these bears. You may want to make these bears jointed, for example, but this is not essential to complete the bears!
Important Note on Construction
You will notice that there will be two ways to construct your bears once you're at the point of attaching all the arms, legs, head and ear pieces to the body. Please read the instructions carefully to achieve the desired look for your bear. Your bear will have either a more pronounced rump and will sit with a more upright posture, or a more squishy pop belly and slouched, more traditional posture.

The panel has multiple fabric options for feet and paws. Patterned or plain can be used depending on the desired look. You can also mix and match the colours! I have also left the "Leave Unsewn" sections on the fabric pieces when cutting them out as I know all too well that I'm likely to forget to leave a gap when sewing and have to seam rip a section. You don't have to do this, you can just cut them off and remember where not to sew - I just find it helpful for me!
Step-by-Step Instructions
1 - Cut all of the pattern pieces out that you require using the dashed lines as mentioned in the "You will need" section above.

Your fabric pieces should all look as below:


ARMS
2 - Take both inner arms and both paws and lay them out as mirror image - like the left image below. Flip the paw so that the fabrics are right sides together and the straight edges are aligned, then clip/pin into place - like the right image below. Repeat for both the left and right inner arm and paws.


Using a ¼-inch seam allowance using a straight stitch, sew across the straight edge you just aligned and clipped/pinned into place. Not forgetting to backstitch at the beginning and end of your stitches.


3 - Open out and lay the corresponding outer arms on top of the inner arm right sides together. Clip/Pin them into place. Pay close attention to the positioning of the section labelled "Leave Unsewn". You may have already marked this when cutting it out if you didn't leave the tag intact to remind you.


Using a ¼-inch seam allowance using a straight stitch, sew around the outer edge, making sure to leave the gap unsewn. This gap is used to turn your arm right sides out (aka - the right way round). Once sewn, if you left the "Leave Unsewn" tag, you can snip it off here.
Using approximately 1cm spacing, snip around the seam allowance. Be careful not to cut into your stitches. This makes sure that when your arm is turned right side out that the shape of the arm has smooth edges.


Using the gap that you left unsewn, turn the arm the right way out.


EARS
3 - Put two ear pieces right sides together and pin/clip the curved edges of the fabrics. Using a 1/4" seam allowance, straight stitch sew around that curved edge. Do this step for both ears.


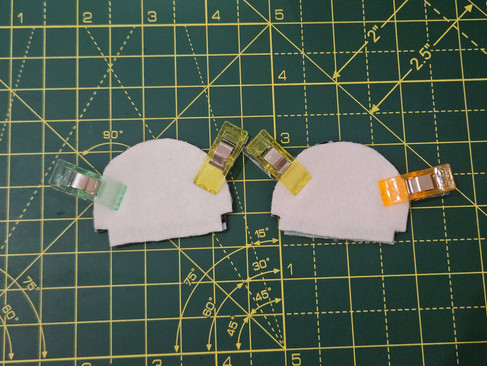
Once sewn snip every 1 cm into the curved seam allowance, being careful not to snip into your stitches, and turn the ear the right side out using the straight edge gap that was left unsewn. You can cut off your "Leave unsewn" tab here if you have them attached still. Repeat this with both ears.


LEGS
4 - Take a mirrored pair of legs, place them right sides together. Pin/clip them together making note of the areas you need to leave unsewn.

Using a ¼-inch seam allowance using a straight stitch, sew the curved areas of the leg leaving the straight edge unsewn and the marked curved area unsewn, too.


You can cut the "Leave Unsewn" tabs off here if you kept them intact when cutting your panel out. Repeat step 4 for the other leg.


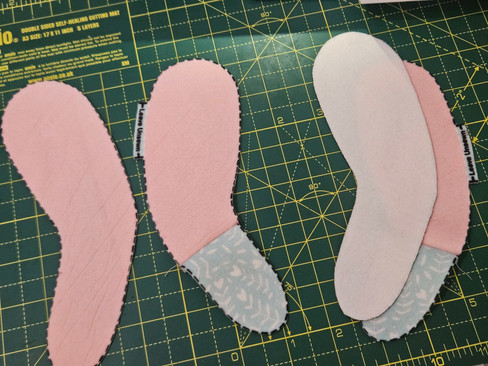
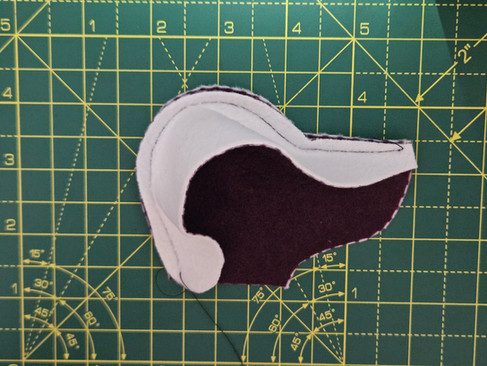
5 - Open the straight edge of the leg. Get one of the foot pieces and place it right sides together to the sole of the foot. The edges will align. Clip/pin into place.

Once clipped/pinned into place, it will look like this.

Using a ¼-inch seam allowance straight stitch sew around the edge that you've just clipped/pinned into place.
You can cut off your "Leave unsewn" tab here if you have them attached still.


Using approximately 1cm spacing, snip around the seam allowance. Be careful not to cut into your stitches. This makes sure that when your leg is turned right side out that the shape of the leg has smooth edges.
Turn the leg the right side out through the gap you left unsewn. Repeat this with both legs.


BODY
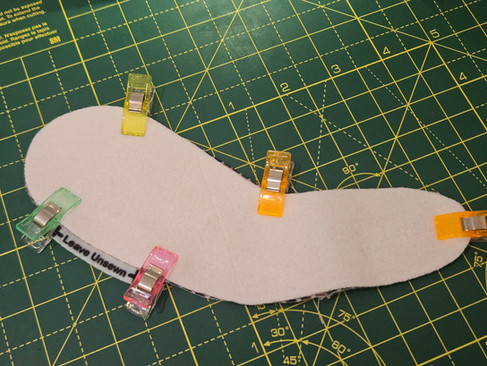
6 - Using both body pieces, place them right sides together aligning the edges. Clip or pin into place.

Using a ¼-inch seam allowance straight stitch sew around the edge that you've just clipped/pinned into place. Make sure not to sew the area labeled "Leave Unsewn".
Using approximately 1cm spacing, snip around the seam allowance. Be careful not to cut into your stitches.


You can cut the "Leave Unsewn" tabs off here if you kept them intact when cutting your panel out. Turn right side out through the unsewn gap.
HEAD
7 - Using one of the head sides and the head gusset, lay them as below to get the positioning correct. Make note that the nose of the head side is pointed in the same direction as the narrow straight edge of the head gusset.

Align the narrow short edge of the head gusset with the pointed nose of the head and clip/pin into place.
Align the curved edge end of the head gusset with the straight neck edge of the head piece, and clip/pin into place.
Align the head gusset edge evenly around the rest of the head side and pin/clip into place.


Using a ¼-inch seam allowance straight stitch sew around the edge that you've just clipped/pinned into place.


Using the other side of the head, place it right side down (so that the plain white of the fabric is facing you) as the image below.

Place that head side piece on top of the other half of the head, aligning the top edge with the raw edge that was left on the other side of the head gusset. Clip/Pin into place like the image below.

Using a ¼-inch seam allowance straight stitch sew around the edge that you've just clipped/pinned into place.


Align the nose curve down to the neck of the head and clip/pin into place.
Using a ¼-inch seam allowance straight stitch sew around the edge that you've just clipped/pinned into place.


Using approximately 1cm spacing, snip around the seam allowance. Be careful not to cut into your stitches.
You can cut off your "Leave unsewn" tab here if you have them attached still. Turn right side out using the straight edge gap you left unsewn.


EYES & NOSE
8 - Using either a safety nose or a button, attach/sewn into place at the end of the nose on the newly created head.

Make sure if you use safety noses that the back is firmly clicked onto the post as tightly as you can. This will prevent the nose from falling off.


Using either 2 safety eyes or buttons, attach/sewn into place 1.5 inches from the nose following the seam along either side of the newly created head.


You now have a bear head with a nose and 2 eyes, without ears!

BEAR SOFT TOY FILLING & CONSTRUCTION
9 - You will now have all the components turned right side out that's needed to complete your bear!

Let's make this bear all plump, squishy and cuddly! Grab your soft toy filling. How to Stuff Your Bear
Start Small:
Break the stuffing into small pieces rather than using large clumps to prevent lumps.
Fill Gradually:
Work the stuffing into the bear's parts, such as the arms, legs, and head, to ensure even distribution.
Stuff with Purpose:
Stuff the head and legs firmly to give the bear structure and a good shape.
Check as You Go:
Periodically check the bear to see how it's filling out. You can add more stuffing as needed to achieve the desired look and feel.
Don't Overstuff:
Stop adding stuffing before the fabric looks strained or you see stitches pulling.


10 - Hand sewing the turning gaps closed using a ladder/invisible stitch. How to Hand Sew Ladder Stitches
Knot off your thread using a quilters knot
Hide your knot inside the seam
Take a stitch on one side of your fabric parallel to the edge
Jump across to the other side and take another stitch parallel to the edge as well
Continue across your seam, forming a series of stitches that look like a ladder
Pull thread tight to close seam
Knot off thread and you’re done


11 - Sew the limbs on using hand sewing. Making note of the limb/head placement.
To sew your bear's limbs to it's body by hand:
1 - Place the limb in the desired position and use pins to hold it in place.
2 - Use a strong thread and tie a knot on the inside of the body where the limb will attach.
3 - Create a series of strong stitches using a whip stitch or ladder stitch, alternating between the body and the limb to secure them together.
4 - Ensure your stitches are tight and secure by making a few stitches on the same spot before tying off the thread and burying the tail inside the toy.


Using the 2 ears, pin into place then attach/ ladder stitch sew into place 1.5 inches from the eye following the seam along either side of the newly created head.
PLACEMENTS FOR PRONOUNCED RUMP & UPRIGHT POSTURE
1 - Body placed with the straight section facing to the right.
2 - Top of the leg aligned with the start of where the rump starts to curve outwards.
3 - Top of the arm, paw facing inwards, aligned with the leg placement 1.5 inches from the top of the body.
4 - Head central to the top of the body.


PLACEMENTS FOR PRONOUNCED RUMP & UPRIGHT POSTURE
1 - Body placed with the curved pop belly section facing to the right.
2 - Top of the leg aligned with the start of where the back starts to curve outwards from the neck.
3 - Top of the arm, paw facing inwards, aligned with the leg placement 1.5 inches from the top of the body.
4 - Head central to the top of the body.


CONGRATULATIONS!
You're all done. You made it! You created that absolutely adorable stuffed bear right in front of you! I hope you're proud of yourself - you deserve it!

We'd love to see your makes over at the Knighton Fabrics Community group on Facebook! Have the most wonderful day!
Sophie
Team Knighton Fabrics


Comments